1. Local User
1.1 Add user
Click User-Local user, click Add to add Raysync users.
| Options | Function Description |
|---|---|
| Name | Account real name |
| Account number | Cannot be modified after successful creation |
| Password |
Passwords can be edited manually or automatically generated Password must contain lowercase, uppercase, number, and special characters at a length between 8 and 20. Can not include account name. The password and account number cannot be the same. Special symbol support: _~!@#%$.^-+*(){}? |
| Department | Establish a department for users |
| Forced password change on first login | When this function is enabled, user must change the initial password upon the first login |
| Support email login | |
| Department | Establish a department for users |
| Account validity |
|
| Account status |
|
| Email notification |
Email notification after successful account creation:Including account information, server address, login method (optional). Only supports setting when creating a user. |
| Home directory | User's personal file storage location |
| Virtual directory | After adding a virtual directory, users can view the user's virtual directory in the foreground and transfer and operate the files in the virtual directory. Support adding multiple virtual directories. Virtual directory alias: based on a path under the user's home directory; virtual directory path: based on a valid path to virtual storage. |
| Delete user home directory regularly |
When turned on,The system will automatically move the files in your home directory to the recycling path or delete them according to the file cleanup rules. (Only supports local storage) The cleaning rules can be based on the accessed time of the file or the modified time of file. The files cleaned based on the accessed time can only clean up temporary files that have not been uploaded (based on the accessed time of the file) or all files that meet the conditions. |
| Disable access paths | Set the paths that the user is prohibited from accessing, so that the front-end user page cannot display the files (folders) of this path, and cannot create, delete, rename, copy, move, upload, or download the files (folders) that are prohibited from accessing. Refer to the rules in the prompt to fill in |
| Allowed access path | Set the path that the user is allowed to access. The foreground user can only see the set path and can set files or folders. You cannot create, delete, rename, copy, move, upload, or download the paths other than the allowed access path. Enter the rules according to the tips |
| Maximum storage capacity | Set the upper limit of storage capacity for this user in the current space. When the used storage space exceeds the set upper limit, new files will no longer be stored. After turning it on, real-time statistics will be performed on file transfers and file operations. Global statistics will be performed at a default interval of 1 hour. Note that by default, only local storage is counted. If you need to count object storage or modify the statistical period, you can enter [Space] - [Space Statistics] to configure. |
| Permissions | File list, download files, delete, rename, create folders, upload files, sync folders, move, copy, invite, share |
| Upload file option | After enabling only upload new files, users can only upload newly added files, and cannot upload files with the same name. |
| Upload and download speed limit | Limit the upload and download speed of the user, the default speed is unlimited |
| Transfer file format | Transfer file format is divided into white list and black list. The whitelist is used to configure the file formats that the system allows to upload. Blacklist is used to configure the file formats that the system does not allow to upload. Multiple formats should be separated by ";", such as "txt;iso;mp4". |
| Transfer File Filtering | 1) Prohibit users from setting filtering criteria when creating synchronization tasks 2) Support transfer file (folder) blacklist and whitelist, meet the conditions of the file will be filtered or transmitted, support wildcard. For example, if files starting with test need to be filtered during transmission, enable the blacklist and enter test*. 3) Support to skip files whose file size exceeds the set size when transferring |
| Mailbox sender | Send with administrator's configured mailbox: After setting, you need to configure the mailbox in the administrator's background mailbox settings before using. Email notifications such as sharing links will be sent to the mailbox configured by the administrator; Sending by user configured mailbox: After setting, users need to configure the mailbox in the account settings before using. Email notifications such as sharing links will be sent to the mailbox configured by users. |
| Share download email notification | 1) Link and password will be sent in one email 2) Link and password will be sent in different emails |
| IP Login Whitelist | After checking Enable, enter the IP address that allows the user to login in the input box. Multiple IP addresses should be separated by ";", such as "127.0.0.1; 172.16.4.55; 192.169.80.12", and the suggested wildcard [] is supported, such as 172.16.[0-100]. [0-100] |
| Email validation | Login validation using only password |
| Sync task frequency | When enabled, the frequency of all sync tasks will be in compliance with this setting, users cannot set the frequency when creating and editing sync tasks in the User Portal |
| Prompt when logging in for the first time | After turning it on, a prompt will pop up on the user's home page when the user logs in for the first time. |
| Do not show hidden files | The file list does not show hidden files that start with "." |
| Disable the peer-to-peer | Turn off peer-to-peer transport for user |
1.2 Edit user
Can edit user's password/home directory/permissions/speed limit/user group/prohibited path/synchronous directory function/file format transfer restriction/upload file option/file filtering/virtual directory/IP login whitelist/etc. Select any user and click Edit.

1.3 Lock/unlock user
Select any unlocked user and click Lock; for any locked user, click Unlock to unlock.

1.4 Delete user account
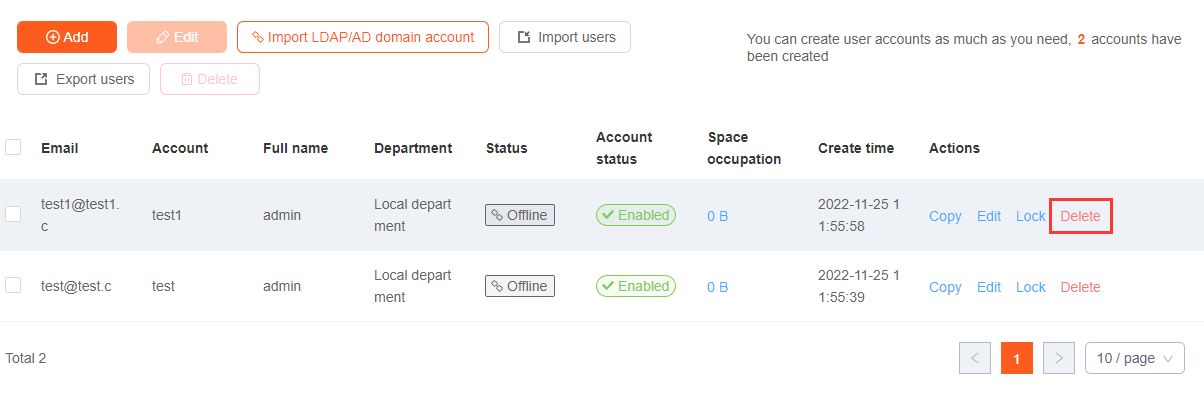
Check the users you want to delete and click Delete above. Click confirm to delete successfully.

1.5 Import LDAP/AD domain account
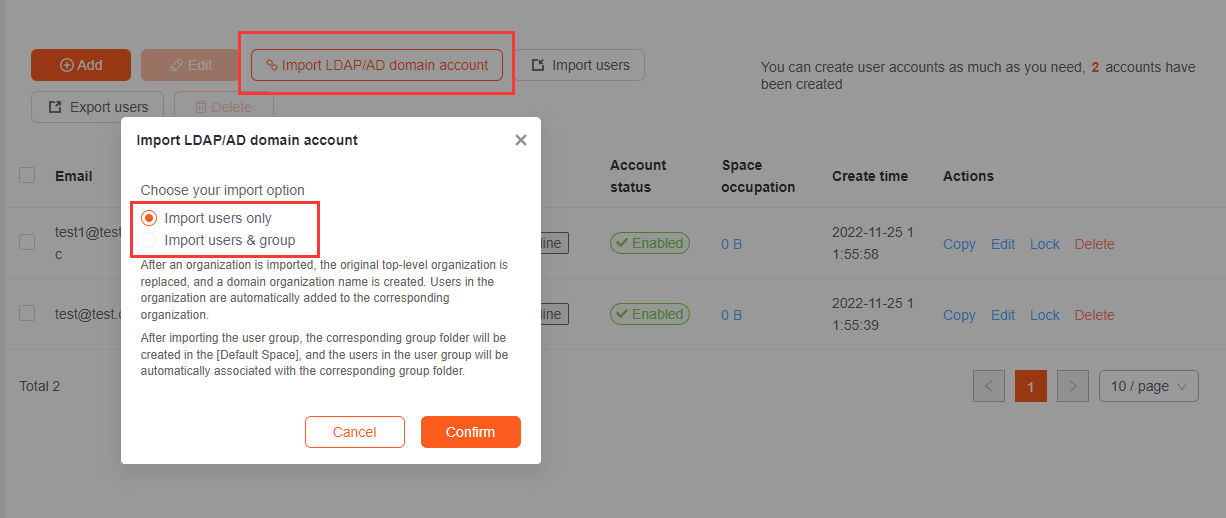
Click Import LDAP/AD domain account to actively import all domain user accounts created by the domain server, provided that you need to configure LDAP/AP domain in User Integration - Third-party Authentication to support this feature.

1.6 Import/Export users
Click Import User to fill in the account, mailbox, and password through the specified template. Click Export User to export the mailboxes, accounts, and names of all accounts.

1.7 Batch edit users
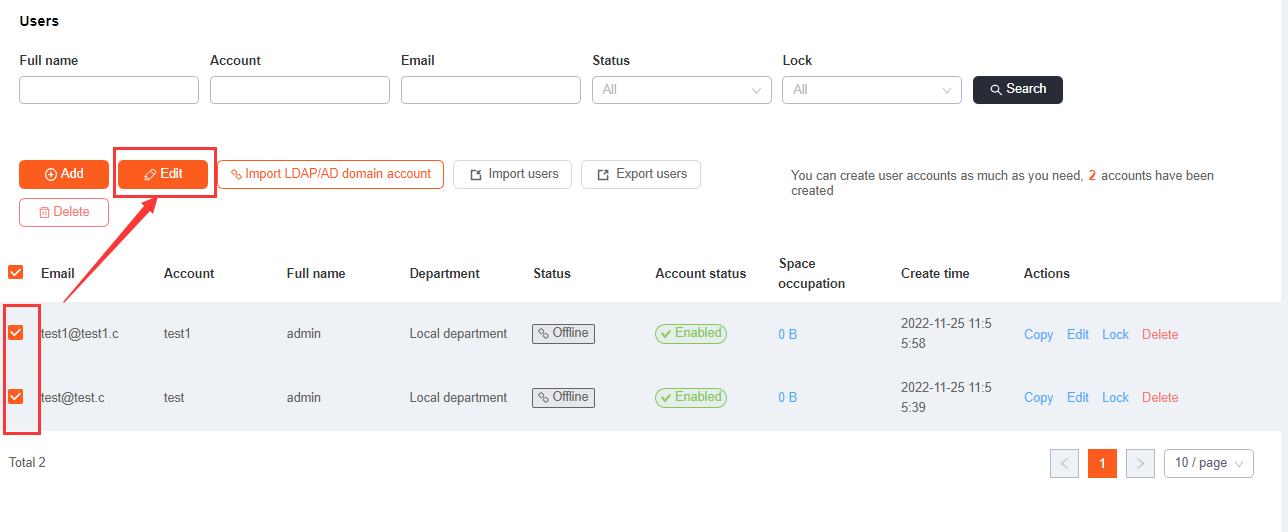
Select the account number that needs to be edited, click Edit to edit the status, directory settings, transmission settings, and security settings of the account number in batches

1.8 Copy user
Select the account you need to copy, click Copy to copy an account with the same settings, but the mailbox, account number, password, and name need to be configured separately.

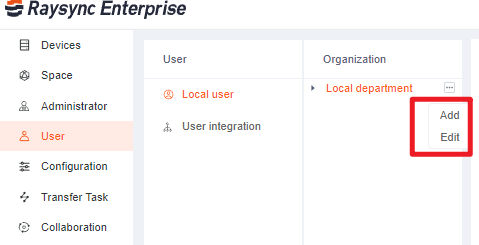
1.9 Organization
Support the creation department and add users to the department. When importing the AD domain account, it can be imported directly according to the user's organization to facilitate the administrator to manage the user. The system defaults to the Local department.
