Rsync from Remote to Local: In-Depth Tutorial in 2025
February 27, 2025Working with remote servers and need to get files onto your local machine? Rsync is a powerful and versatile tool for this, but it can be a little tricky to get the hang of.
That's why we've put together this in-depth tutorial for 2025, covering everything you need to know about Rsync from remote to local.
Whether you're a beginner or looking to brush up on your skills, this guide will walk you through the process step by step.

Is Rsync Transfer from Remote Server to Local Machine Available
Yes, absolutely! Rsync is very capable of transferring files from a remote server to your local machine. This is a common use case for Rsync, often used for backups, mirroring, and syncing data.
Here's a basic idea of how it works:
- Rsync over SSH: Rsync typically uses SSH (Secure Shell) to establish a secure connection with the remote server. This ensures that your data is encrypted during transfer.
- Specifying the source and destination: You tell Rsync where the files are on the remote server (the source) and where you want them to be saved on your local machine (the destination).
- Rsync does the rest: Rsync efficiently transfers the files, and thanks to its delta-encoding, it only transfers the changed portions of files, saving bandwidth and time.
How to Transfer Rsync Files from Remote to Local
Transferring files from a remote server to your local machine using Rsync involves a few steps. Here's a breakdown:
1. Prerequisites:
- Rsync Installation: Ensure Rsync is installed on both your local machine and the remote server. Most Linux/macOS systems have it pre-installed. For Windows, you might need to install it via WSL (Windows Subsystem for Linux) or a similar environment.
- SSH Access: You need SSH access to the remote server. This means having an account on the server and knowing your username and password (or preferably, using SSH keys for more secure and convenient access).
2. Basic Rsync Command Structure:
The core command structure for a remote-to-local transfer is:
- rsync [options] [user@]remote_host:remote_path local_path
Let's break this down:
- rsync: The command itself.
- [options]: Various options to control the transfer (more on these below).
- [user@]remote_host: Your username (if different from your local username) followed by the remote server's hostname or IP address. For example, user@example.com or 192.168.1.100.
- :remote_path: The path to the files or directory on the remote server you want to transfer. Be sure to include the colon (:) after the remote host. For example, /home/user/my_files/ or /var/www/html/.
- local_path: The path on your local machine where you want to save the files. For example, /home/user/my_backups/ or C:\backups\.
3. Common Rsync Options:
Here are some of the most frequently used options:
- -a (archive mode): This is a crucial option. It recursively copies directories, preserves symbolic links, file times, permissions, etc. It's generally recommended.
- -v (verbose): Provides more detailed output about the transfer progress. Use it for debugging or to see what's happening.
- -z (compression): Compresses the data during transfer, which can be helpful for large files or slow connections.
- -e ssh: Specifies that you want to use SSH for the connection (which is almost always the case for remote transfers).
- --progress: Shows the transfer progress.
- -n (dry-run): Performs a "dry run" – it shows you what would be transferred without actually transferring anything. This is excellent for testing your command before running it for real.
4. Example:
Let's say you want to copy the directory website_files from the remote server example.com (username myuser) to your local directory website_backup:
- rsync -avz -e ssh myuser@example.com:/home/myuser/website_files/ /home/user/website_backup/
5. SSH Keys (Recommended):
Using SSH keys instead of passwords is highly recommended for security and convenience. It avoids having to type your password every time. You'll need to generate an SSH key pair on your local machine and add the public key to the authorized_keys file on the remote server. There are many tutorials available online on how to set up SSH keys.
6. Troubleshooting:
- Connection refused: Check your SSH connection to the remote server. Make sure the server is running and that you can connect to it using SSH.
- Permission denied: Ensure you have the necessary permissions on the remote server to read the files you're trying to copy.
- Incorrect paths: Double-check the paths to the files on both the remote server and your local machine. Even a small typo can cause problems.
How to Transfer Rsync Files from Local to Local
Okay, so you want to move files around on your own computer using Rsync? That's a great way to do it, and it's actually simpler than dealing with remote servers. Think of it like a super-powered copy-and-paste, but with a lot more control.
Here's the lowdown on transferring files locally with Rsync:
Imagine you have a folder full of photos called "SummerVacation" and you want to back it up to another folder called "SummerVacationBackup." Here's how you'd do it:
- rsync -avz /path/to/SummerVacation/ /path/to/SummerVacationBackup/
Let's break that down a bit:
- rsync: That's the command we're using.
- -avz: These are options that tell Rsync how to behave. -a is like the "archive" mode – it copies everything, including folders, and keeps all the file information intact (like when it was created, who owns it, etc.). -v just means "verbose," so Rsync will tell you what it's doing. -z compresses the files during the transfer, which can be helpful even locally if you're dealing with huge files.
- /path/to/SummerVacation/: This is where your photos are now. Make sure you get the path right! The trailing slash is important here. It means "copy the contents of this folder."
- /path/to/SummerVacationBackup/: This is where you want the photos to end up. Again, double-check the path!
A few other things to keep in mind:
- The -n (dry-run) option: Before you actually move anything, it's always a good idea to do a dry run. Just add -n to your command: rsync -avzn .... This will show you exactly what Rsync would do without actually doing it. This is a lifesaver if you're worried about accidentally deleting something.
- The --delete option: If you want to keep two folders exactly the same, use --delete. For example, if you delete a photo from "SummerVacation," --delete will also remove it from "SummerVacationBackup." Be careful with this one!
Why use Rsync locally? You might be thinking, "Why not just copy and paste?" Well, Rsync is smarter. If you make a small change to a big file, Rsync only copies the changed part, not the whole thing again.1 This can save a lot of time, especially with large files or if you're syncing folders regularly.
How to Transfer Rsync Files from Local to Remote
Here's the breakdown of how to transfer files from your local machine to a remote server using Rsync:
Let's imagine you have a folder on your computer called "MyProject" and you want to send it to a server (maybe it's called "myserver.com") to a folder called "project_backups."
Here's the basic command you'd use:
- rsync -avz /path/to/MyProject/ your_username@myserver.com:/path/to/project_backups/
Let's unpack that a bit:
- rsync: This is the command itself.
- -avz: These are options that tell Rsync how to behave. -a stands for "archive" mode, which is highly recommended. It copies everything recursively (including subfolders), keeps all the file information intact (like permissions and timestamps), and preserves symbolic links. -v is for "verbose," so Rsync will tell you what it's doing. -z compresses the data during the transfer, which is especially useful for large files or slow internet connections.
- /path/to/MyProject/: This is the path to the folder on your computer that you want to transfer. Make absolutely sure you have the path correct! The trailing slash is important here. It means "copy the contents of this folder."
- your_username@myserver.com: This is how you tell Rsync where to send the files. Replace your_username with your actual username on the remote server, and myserver.com with the server's address (it could be a domain name or an IP address).
- :/path/to/project_backups/: This is the path to the folder on the remote server where you want to put the files. The colon (:) is crucial; it separates the server address from the path on the server.
Example:
Let's say your username on the server is "bob" and the server's address is "mywebsite.com," and you want to copy your "MyProject" folder to the "/var/www/html/backups" folder on the server. The command would look like this:
- rsync -avz /path/to/MyProject/ bob@mywebsite.com:/var/www/html/backups/
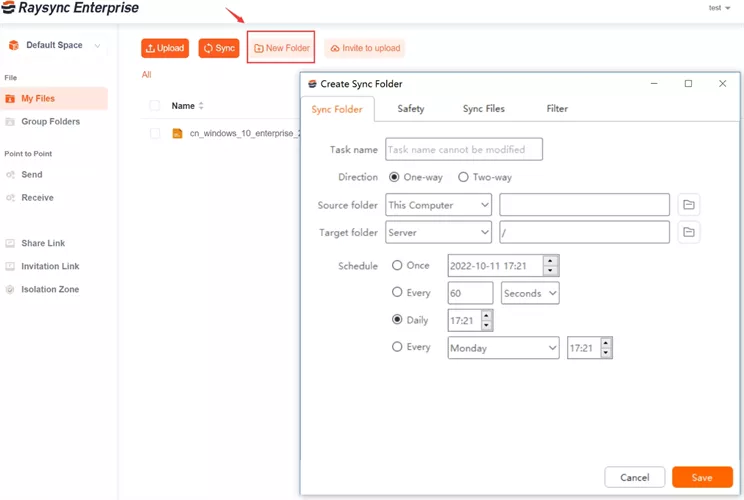
Extra Tips: Fast File Transfer from Remote to Local (for Business Use)
For businesses prioritizing speed, security, and ease of use in their remote-to-local file transfer workflows, Raysync is highly recommended.
While Rsync remains a viable option for basic file synchronization, Raysync's advanced features and performance advantages make it a compelling choice for organizations dealing with large data volumes, time-critical transfers, and complex file management requirements.
If your business needs fast, reliable, and secure file transfers, especially from remote servers to local machines, evaluating Raysync is a worthwhile investment.
Let’s look at the pros and cons of Rasysnc:
Pros:
- Lightning-fast transfer speeds.
- Enterprise-grade encryption for security.
- User-friendly interface with minimal setup.
- Real-time syncing and monitoring.
- Cross-platform compatibility.
Con:
- Raysync requires a paid license for advanced features.
Pricing Model
- Small Business: $99/month.
- SMB: $1,599/year.
- Custom Plans: Tailored for large-scale enterprises.
Conclusion
Rsync is a solid choice for basic file synchronization. But for businesses juggling massive data, its limitations can be a bottleneck. Raysync offers a modern, faster alternative with intuitive dashboards and enterprise-grade features. Ready for seamless, high-speed file transfers? Explore Raysync today!
You might also like
Industry news
May 29, 2024The top 6 enterprise file sharing solution of 2025, are recommended to enhance the data security and collaboration capabilities of your enterprise. Explore these options to find the best fit for your business.
Industry news
November 14, 2024This guide explores AWS SFTP, its features, pricing, and user feedback, helping you decide if it's the best choice or if there are more affordable options.

Industry news
December 16, 2020Aiming at the problem of the transnational transmission of large files, we break down the problem into two small problems, so it is easy to draw a final conclusion.